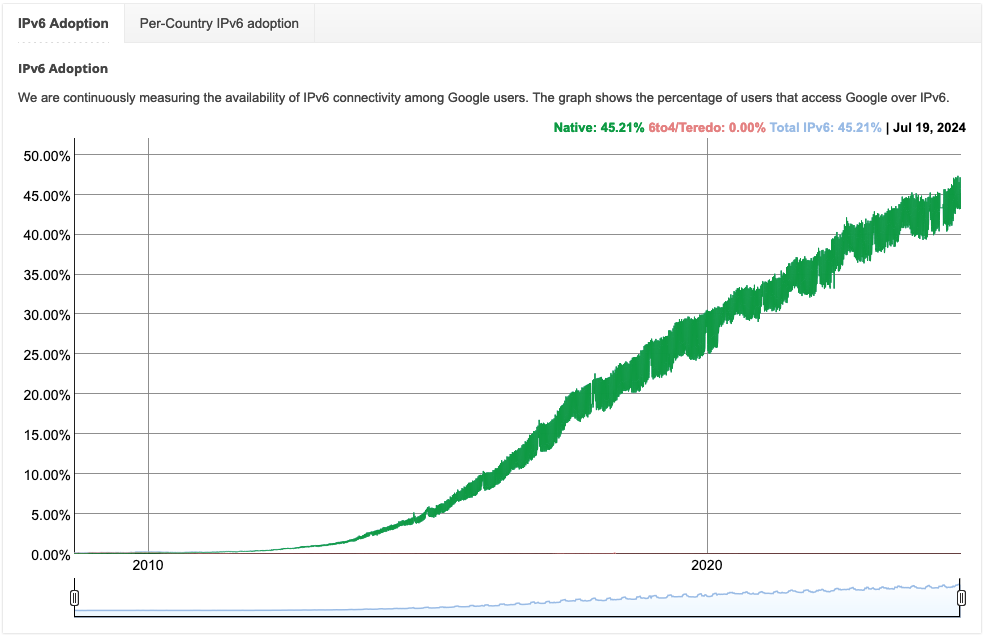
I’ve been hearing for the last 15 years that IPv6 is the future. Is it though? Google tracks it and it seems we came a long way since pre-2010 and we’re currently sitting at 45%. Not bad, not great.
I’ve been running pfsense for the last 4 years and at the beginning of the year I decided it was time to finally set it up on the home network. I looked at my options and remembered that my ISP could allocate me an IPv6 range. I wrote to them and explained my case, they were happy to accommodate me and assigned me a dynamic IPv6 /56 range.
That was not the worst part. I could live with a dynamic IPv6 but ping to Cloudflare’s DNS servers was consistently over 300 ms and the website took ages to load. That was clearly unacceptable so I started researching how to get my IPv6 range.
ASN registration and getting IPv6 allocation
I had no idea what ASN was and how to get it. Fortunately, I found a great blog post that explains it in detail. The whole series is worth the read if you’re going down the rabbit hole of IPv6. I chose RIPE as my RIR because it’s European (although they recently started charging 50€/year for an ASN).
How to get ASN
I chose to find an LIR that offers an ASN + IPv6 (PA) bundle. I used Scaleblade (RIPE-02 bundle) but there are others.
LIRs willing to sponsor your ASN:
After you choose your LIR for sponsorship you need to:
- Register RIPE NCC Access account.
- Create the next objects in the RIPE database: “role and maintainer pair” and “organisation”. I followed a guide from FreeTransit.
- Send the chosen LIR all information from the above objects and sign an agreement with them.
- LIR sends you an identity verification link from RIPE - complete verification
- RIPE issues your ASN
So right now it’s gonna cost me cca 90€/year to have my IPv6 /44 range and ASN. Again not really great but also not terrible. I consider myself an early adopter although at a 45% IPv6 adoption rate I wouldn’t say I am anymore.
Next steps
Once you get your PA (Provider Aggregatable) IPv6 addresses allocated the real fun starts. Just getting the IPv6 range itself means nothing. You’ll need to get yourself familiar with the RIPE database to add route6, inet6num and other objects to it.
I got an allocation of IPv6 /44 block.
2a12:bec4:1040::/44
Why can’t I use a /44 prefix? /48 is typically considered the largest subnet (or smallest prefix) for global routing in IPv6. This is an important concept in IPv6 addressing and routing strategy. I have 16 available /48 for global routing (IPv6 Subnet Calculator).
1. 2a12:bec4:1040::/48

[...]

16. 2a12:bec4:104f::/48
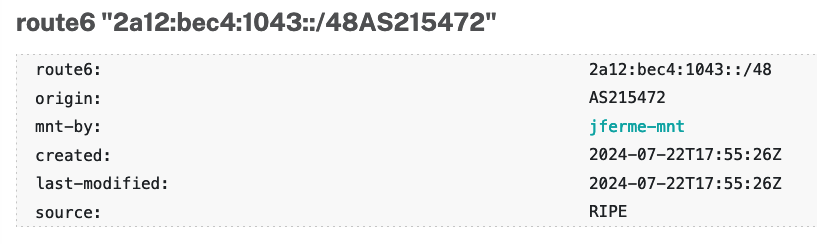
Now I have to go to My Ripe add a route6 object declare my intention to route this prefix and provide a mechanism for others to verify that I’m the authorized holder of this address space.
The next step is to go to your LIR website (I chose Scaleblade and they support this) to add an ROA (Route Origin Authorization) which is a cryptographically signed object that states which Autonomous System (AS) is authorized to originate a particular IP address prefix or range.
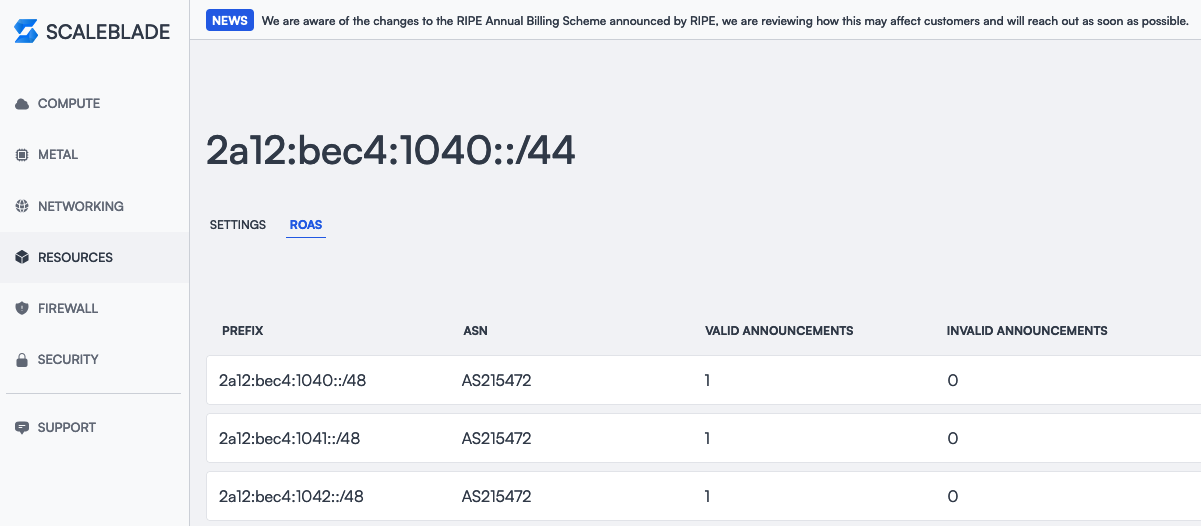
ROAs are a key component of RPKI (Resource Public Key Infrastructure), which is designed to improve the security of the Internet’s routing infrastructure, particularly BGP (Border Gateway Protocol). ROA adds an additional layer of security to your routing announcements, complementing the route6 object you’ve already created in the RIPE database.
Announce your prefix to the world (BuyVM/Frantech)
After creating a route6 object and an ROA, the next logical step in establishing my IPv6 presence is to announce your prefix to the Internet. I’d say a “logical step” but believe me I was chasing my own tail until I figured that one out. I really recommend IPv6 networking discord which can point you in the right direction.
After a while, I found what I thought was the easiest solution and that’s to find a VPS provider that offers BGP sessions. Here are some of the providers I found:
- BuyVM/Frantech (aff link to help me with my hobby)
- iFog
- Vultr
- Xenyth
In the end, I chose BuyVM/Frantech and I’ll focus on how to configure the BGP session with them and announce my prefix (Luxembourg location). One of the important factors why I chose them was unmetered bandwith.
BGP session
- Select one of their VPS options (I went for the SLICE 1024) and install Debian 12
- Open a ticket with them and request a BGP peering providing your ASN.
- All your RPKI-signed IP prefixes will import automatically within an hour.
- On Stallion go to Your server -> Networking -> IPv6 and assign your server an IPv6 (confirm on a server that your new IPv6 is resolving otherwise add it manually)
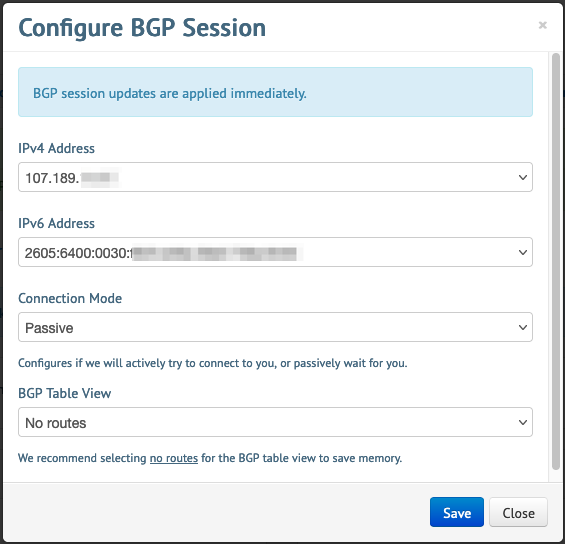
- Then go to Your server -> Networking -> BGP -> Configure Session and select your server’s IPv4, IPv6, Connection mode, and BGP Table View (see my screenshot) and save:
Bird
Now we’ll use BIRD Internet Routing Daemon to establish a BGP session with BuyVM/Frantech peer. BIRD will primarily handle the BGP session with my VPS provider, announce my IPv6 prefix, and manage the routing decisions for my server. It acts as the interface between my server’s network stack and the broader Internet routing ecosystem.
These instructions are for Debian 12:
sudo apt-get update
sudo apt-get install bird
Now edit:
/etc/bird/bird.conf
My configuration looks like this and I must admit it took me a while to actually get it working. I was overwhelmed with BGP sessions and IPv6 prefixes so another complex thing just takes a bit longer to get it right.
log syslog all;

router id 107.189.xxx.xxx; # Your VPS IPv4

protocol device { scan time 5; }

protocol direct {
    ipv6 {
        import none;
        export none;
    };
}

protocol kernel {
    scan time 2;
    ipv6 {
        import all;
        export filter {
            accept;
        };
    };
}


protocol static noAnnounce {
    ipv6;
    route 2605:6400:ffff::2/128 via 2605:6400:30::1%eth0; # Route to ftv6 bgp router
}

protocol static {
    ipv6;
    route 2a12:bec4:1040::/48 via "wg0"; # Wireguard
    route 2a12:bec4:1041::/48 reject;    # Ready prefix for some other time
    route 2a12:bec4:1042::/48 reject;    # Ready prefix for some other time
}

filter ebgp_outbound {
    if proto = "noAnnounce" then reject; # Do not announce local routes
    if (net ~ [ 2a12:bec4:1040::/48,2a12:bec4:1041::/48,2a12:bec4:1042::/48 ]) then accept;
    else reject;
}

protocol bgp FranTech_V6 {

    local 2605:6400:30::xxxx as 215472; # IPv6 assigned to your IPv6
    neighbor 2605:6400:ffff::2 as 53667;
    multihop 2;
    password "XXXXXXXX"; # You need to find this password in your Stallion dashboard
    allow local as XXXXXX; # Your ASN
    ipv6 {
        import all;
        export filter ebgp_outbound;
    };
}
Enable IPv6 forwarding:
sudo sysctl -w net.ipv6.conf.all.forwarding=1
To make this permanent, add net.ipv6.conf.all.forwarding=1 to /etc/sysctl.conf.
Start the BIRD service:
sudo systemctl start bird
Enable it to start on boot:
sudo systemctl enable bird
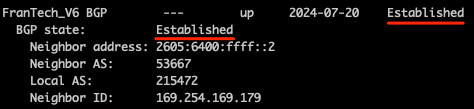
Verify BIRD operation and status:
sudo birdc show protocols all
It should show “Established”:
Wireguard setup
Now let’s setup Wireguard server so we can later use it as VPN tunnel to our pfsense router.
Install Wireguard package:
sudo apt update
sudo apt install wireguard
Generate private and public keys
wg genkey | sudo tee /etc/wireguard/private.key
sudo chmod go= /etc/wireguard/private.key
sudo cat /etc/wireguard/private.key | wg pubkey | sudo tee /etc/wireguard/public.key
Edit:
/etc/wireguard/wg0.conf
My config that works:
[Interface]
PrivateKey = <server_private_key>
Address = 10.8.0.1/24, 2a12:your:range:1040:ffff::2/64
DNS = 1.1.1.1,1.0.0.1,2606:4700:4700::1111,2606:4700:4700::1001
ListenPort = 51820
PostUp = ip6tables -A FORWARD -i %i -j ACCEPT; ip6tables -A FORWARD -o %i -j ACCEPT; ip6tables -t nat -A POSTROUTING -s 2a12:your:range::/64 -o eth0 -j ACCEPT; ip6tables -t nat -A POSTROUTING -s 2a12:your:range::/64 ! -o wg0 -j MASQUERADE
PostDown = ip6tables -D FORWARD -i %i -j ACCEPT; ip6tables -D FORWARD -o %i -j ACCEPT; ip6tables -t nat -D POSTROUTING -s 2a12:your:range::/64 -o eth0 -j ACCEPT; ip6tables -t nat -D POSTROUTING -s 2a12:your:range::/64 ! -o wg0 -j MASQUERADE
Enable and start WireGuard:
sudo systemctl enable wg-quick@wg0
sudo systemctl start wg-quick@wg0
Check status:
sudo wg show
Add a peer (client) to your WireGuard server:
wg genkey | tee client_private.key
cat client_private.key | wg pubkey > client_public.key
Add the peer to your server configuration:
sudo wg set wg0 peer <client_public_key> allowed-ips 2a12:your:range::/48
Create a client configuration file:
[Interface]
PrivateKey = <client_private_key>
Address = 10.8.0.2/32, 2a12:your:range:ffff::3/128
DNS = 1.1.1.1,1.0.0.1,2606:4700:4700::1111,2606:4700:4700::1001

[Peer]
PublicKey = <server_public_key>
Endpoint = <server_public_ip>:51820
AllowedIPs = 0.0.0.0/0, ::/0
Example of my completed config with a test client:
[Interface]
PrivateKey = <server_private_key>
Address = 10.8.0.1/24, 2a12:your:range:ffff::2/64
DNS = 1.1.1.1,1.0.0.1,2606:4700:4700::1111,2606:4700:4700::1001
ListenPort = 51820
PostUp = ip6tables -A FORWARD -i %i -j ACCEPT; ip6tables -A FORWARD -o %i -j ACCEPT; ip6tables -t nat -A POSTROUTING -s 2a12:your:range::/64 -o eth0 -j ACCEPT; ip6tables -t nat -A POSTROUTING -s 2a12:your:range::/64 ! -o wg0 -j MASQUERADE
PostDown = ip6tables -D FORWARD -i %i -j ACCEPT; ip6tables -D FORWARD -o %i -j ACCEPT; ip6tables -t nat -D POSTROUTING -s 2a12:your:range::/64 -o eth0 -j ACCEPT; ip6tables -t nat -D POSTROUTING -s 2a12:your:range::/64 ! -o wg0 -j MASQUERADE

#jan-test
[Peer]
PublicKey = <peer_public_key>
AllowedIPs = 10.8.0.2/32, 2a12:your:range:ffff::3/128
PersistentKeepalive = 25

#your-pfsense-router
[Peer]
PublicKey = <peer_public_key>
AllowedIPs = 2a12:your:range::/48
PersistentKeepalive = 25
Wireguard tunnel to pfsense
Great our Wireguard server is set up but how do we get our IPv6 prefix home? By creating a Wireguard tunnel of course! I’ll be assuming your home network is segregated with VLANs.
In pfsense install a WireGuard package:
- System > Package Manager > Available Packages
- Search for “WireGuard” and install
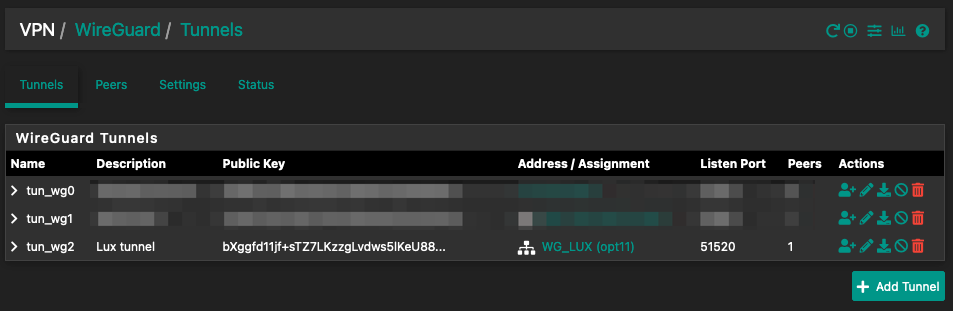
Create WireGuard tunnel:
- VPN > WireGuard > Add Tunnel
- Check Enable Tunnel
- Set Description (e.g., “WireGuard to VPS”)
- Generate a key pair (Private and Public key)
- Set Listen Port (e.g., 51821)
- Set Tunnel Address: 2a12:your:range:1040:ffff::2/64 (copy from wg0.conf on VPS or peer configuration)
Create Wireguard interface:
- Interfaces > Assignments > Available network ports > Choose the tunnel interface you just created (for example: tun_wg0)
- Check Enable interface
- Enter Description (for example WG_VPS)
- IPv4 Configuration Type > None
- IPv6 Configuration Type > Static IPv6
- Static IPv6 Configuration > IPv6 address > 2a12:your:range:1040:ffff::1/64
- IPv6 Upstream gateway > Add a new gateway > Gateway name (WG_VPS), Gateway IPv6 (2a12:your:range:ffff::2) < Wireguard server’s IPv6; click Add
- Save
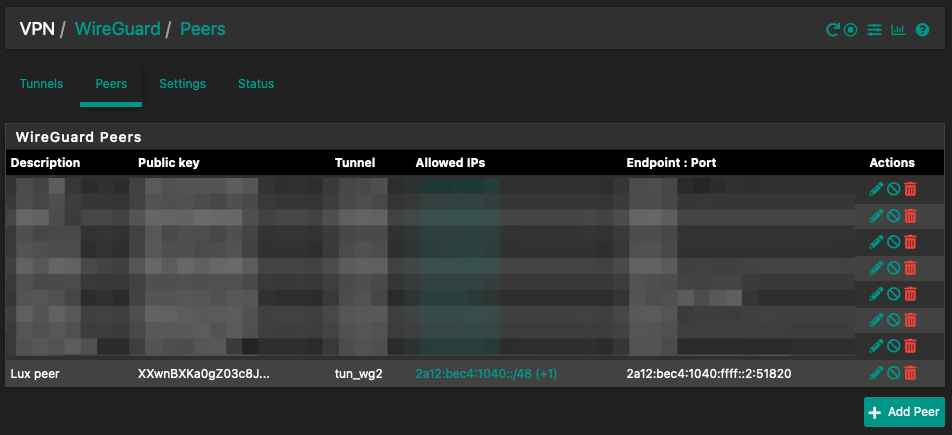
Create a peer
- VPN > WireGuard > Peers > Add Peer:
- Enable > ✅ Enable Peer
- Tunnel > Select tunnel to your VPS
- Description > VPS peer (or whatever you want)
- Endpoint > IPv4 or IPv6 VPS IP
- Port > 51820 (from VPS Wireguard conf wg0.conf)
- Keep Alive > 25
- Public Key > VPS Server Wireguard Public Key
- Allowed IPs > 2a12:your:range::/48 (Enter the whole range if you want segreggate it further)
- Allowed IPs > ::/0
Update peer configuration on VPS:
in /etc/wireguard/wg0.conf modify or add:
#your-pfsense-router
[Peer]
PublicKey = <pfsense_public_key>
AllowedIPs = 2a12:your:range::/48
PersistentKeepalive = 25
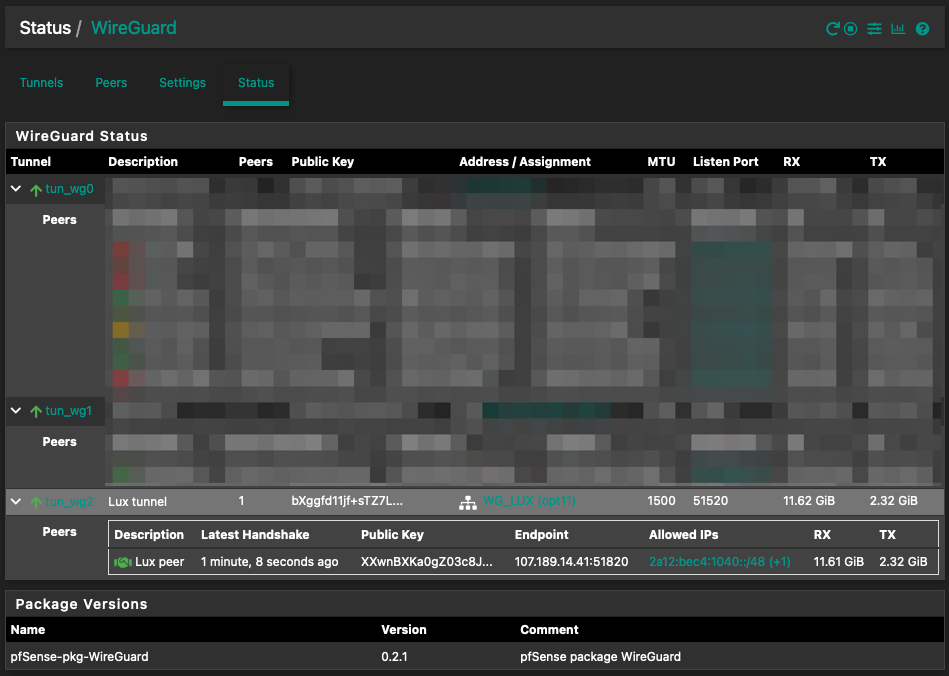
Check Wireguard status:
A green handshake means it’s successfully connected:
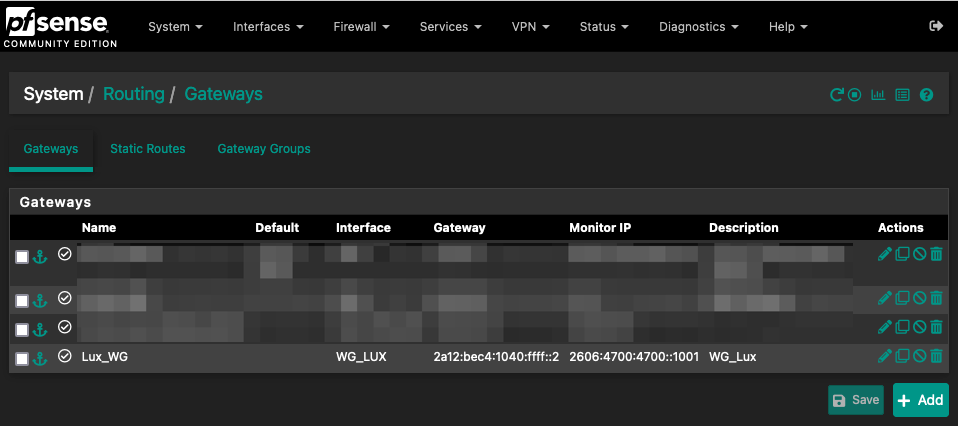
Configure routing:
First, we add a gateway:
- System > Routing > Gateways > Add:
- Interface > WG_VPS
- Address Family > IPv6
- Name > WG_VPS
- Gateway > 2a12:your:range:1040:ffff::2/64 (VPS Wireguard address)
- Monitor IP > 2606:4700:4700::1001
- Description > WG_VPS
Second, we add 2 static routes:
System > Routing > Static Routes > Add 1st:
- Destination network > ::/1
- Gateway > WG_VPS (2a12:your:range:1040:ffff::2)
System > Routing > Static Routes > Add 2nd:
- Destination network > 8000::/1
- Gateway > WG_VPS (2a12:your:range:1040:ffff::2)

Configuring static IPv6
Let’s first configure a static IPv6 for servers, network devices, or any device that needs a constant address. My servers are on VLAN20 so I’ll be using that as an example.
Add additional configuration to an existing VLAN:
- Interfaces > VLAN20:
- IPv6 Configuration Type > Static IPv6
- Static IPv6 Configuration:
- IPv6 address > 2a12:your:range:2::1/64 (Select an IP from your range with a subnet 64)
- Save
Configure DHCPv6 Server:
- Services > DHCPv6 Server > VLAN20:
- Enable > ✅ Enable DHCPv6 server on VLAN20 interface
- Primary Address Pool:
- Address Pool Range > From: 2a12:your:range:2::1000 to: 2a12:bec4:1040:2::2000
- Server Options:
- Enable DNS > ✅ Provide DNS servers to DHCPv6 clients
- DNS Servers: (I’m using Cloudflare DNS servers)
- 2606:4700:4700::1111
- 2606:4700:4700::1001
- Save
Configure Router Advertisement:
- Services > Router Advertisements > VLAN20:
- Router mode > Managed
- Router Priority > High
- RA Subnet(s) > 2a12:your:range:2::/64
- Save
Create firewall rules:
- Firewall > Rules > WireGuard
- Add a rule to allow traffic from the WireGuard interface

Adjust Firewall rules as needed for your network.
Configuring SLAAC IPv6
For my wireless devices, I’m using the SLAAC configuration. SLAAC (Stateless Address Autoconfiguration) is generally considered safer for several reasons:
- Privacy: SLAAC can use temporary addresses that change over time, making it harder to track a device across networks or sessions.
- Decentralized: Each device generates its own address, reducing the risk of a central point of failure or attack (like a compromised DHCP server).
- Reduced attack surface: Without a centralized addressing mechanism, there are fewer opportunities for attackers to manipulate address assignments.
- Automatic operation: Minimizes human intervention in address assignment, reducing the chance of configuration errors.
- Simplicity: Simpler systems often have fewer vulnerabilities.
However, it’s worth noting that SLAAC also has some potential drawbacks, such as less administrative control over address assignments. The best choice depends on specific network requirements and security policies.
Add additional configuration to an existing VLAN:
- Interfaces > VLAN95:
- IPv6 Configuration Type > Static IPv6
- Static IPv6 Configuration:
- IPv6 address > 2a12:your:range:9::1/64 (Select an IP from your range with a subnet 64)
- Save
Although we have a SLAAC option in the interface as well in this case we need to use a STatic IPv6 configuration otherwise we can’t configure Router Advertisements later.
Configure DHCPv6 Server:
- Services > DHCPv6 Server > VLAN20:
- Enable > ✅ Enable DHCPv6 server on VLAN95 interface
- Server Options:
- Enable DNS > ✅ Provide DNS servers to DHCPv6 clients
- DNS Servers: (I’m using Cloudflare DNS servers)
- 2606:4700:4700::1111
- 2606:4700:4700::1001
- Save
Configure Router Advertisement:
- Services > Router Advertisements > VLAN95:
- Router mode > Stateless DHCP
- Router Priority > High
- RA Subnet(s) > 2a12:your:range:9::/64
- Save
Create firewall rules:
- Firewall > Rules > WireGuard
- Add a rule to allow traffic from the WireGuard interface
Adjust Firewall rules as needed for your network.
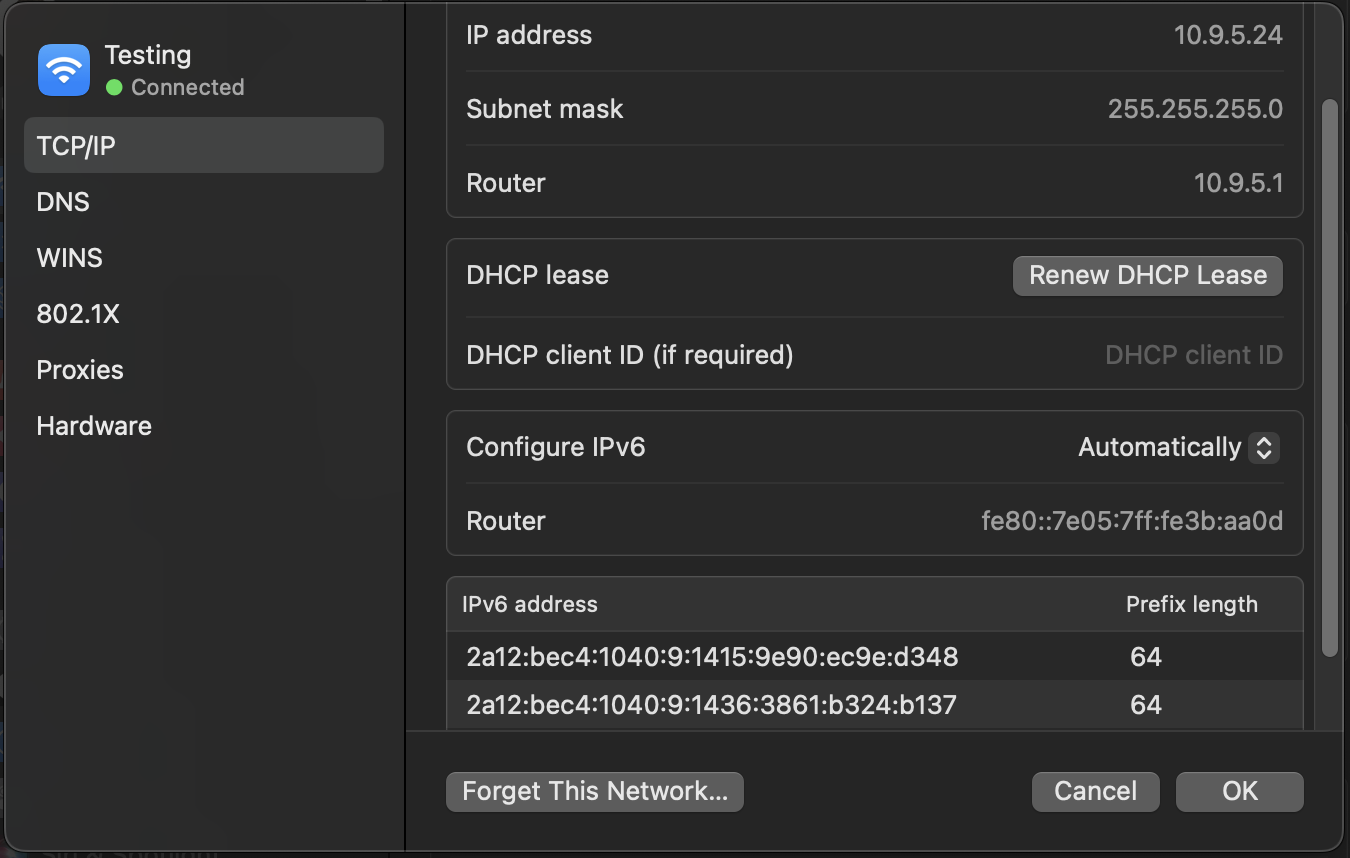
Connect the device to the right VLAN and check IPv6:
When I connect my computer to the Wi-Fi with VLAN95 I see the right IPv6 addresses:
An external check (humble brag: it even says I’m an ISP now):
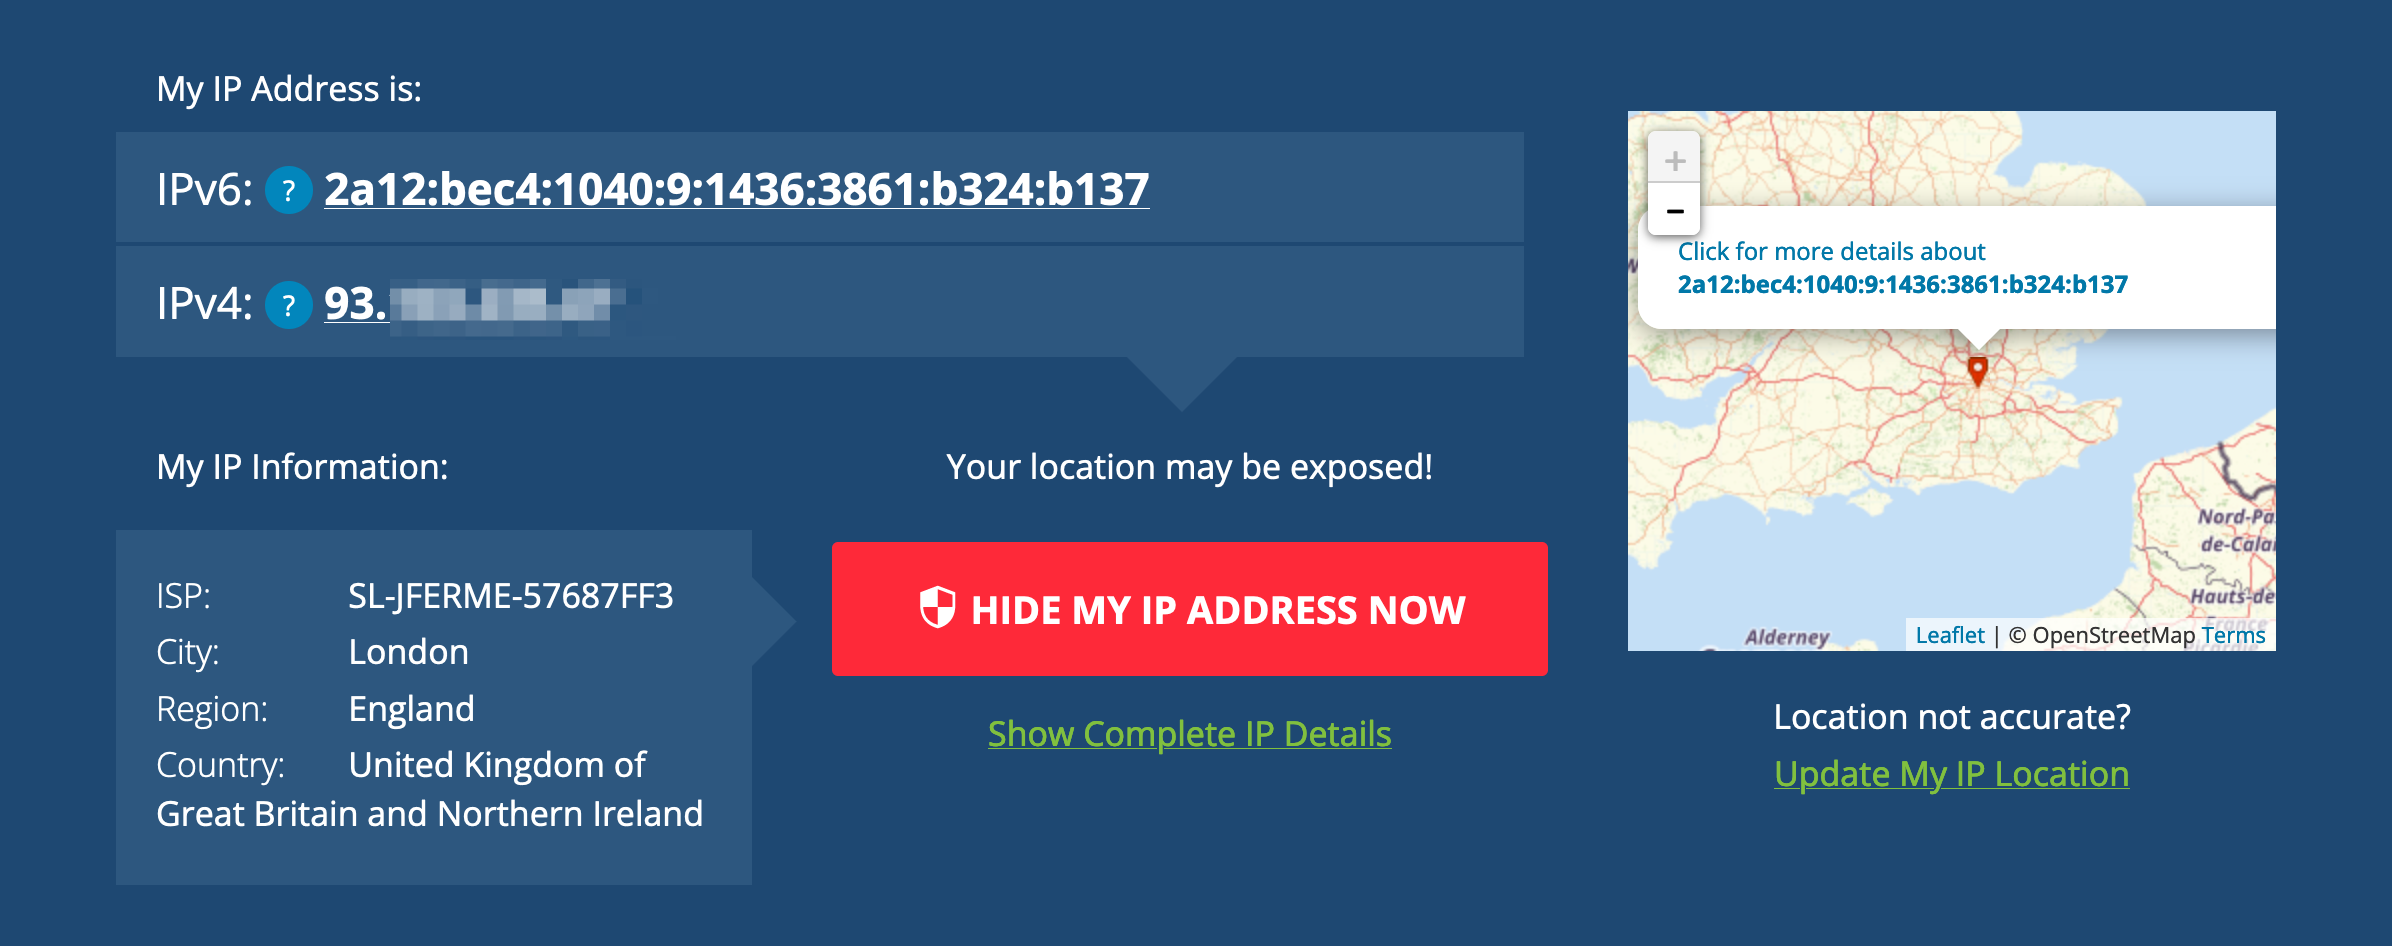
Why two IPv6s?
SLAAC typically assigns two IPv6 addresses for privacy and functionality reasons:
Stable Address:
- Based on the network prefix and the device’s MAC address (or a stable token).
- Used for incoming connections and when a consistent address is needed.
- Remains constant as long as the device is on the same network.
Temporary Address:
- Generated randomly and changes periodically (usually daily).
- Used for outgoing connections to enhance privacy.
- Makes it harder to track a device’s online activities over time.
Conclusion
Congratulations, you have your own ASN, IPv6 /44 block, active BGP session, Wireguard tunnel, and VLANs with assigned IPv6. Wow, you did a lot!