Beginning of a homelab
It all started when my friend E. introduced me to the subreddit Homelab. Coincidentally this was on the 1st of April when we’re quite hopeful that the whole 2020 situation will go away soon. I started reading all the subreddit’s posts and was hooked.
The main reason to build a homelab was to replace my weak Synology 216play and to extend my storage, my computing power, and learn more about hypervisors, container systems, etc. Did I achieve that? Let’s find out.
People who know me know that I have a history with hardware and assembling and disassembling computers. I do not have so much experience with enterprise-grade hardware and this was a great opportunity. Especially because I love setting up hardware and later software on all kinds of computers.
Preparing the basement
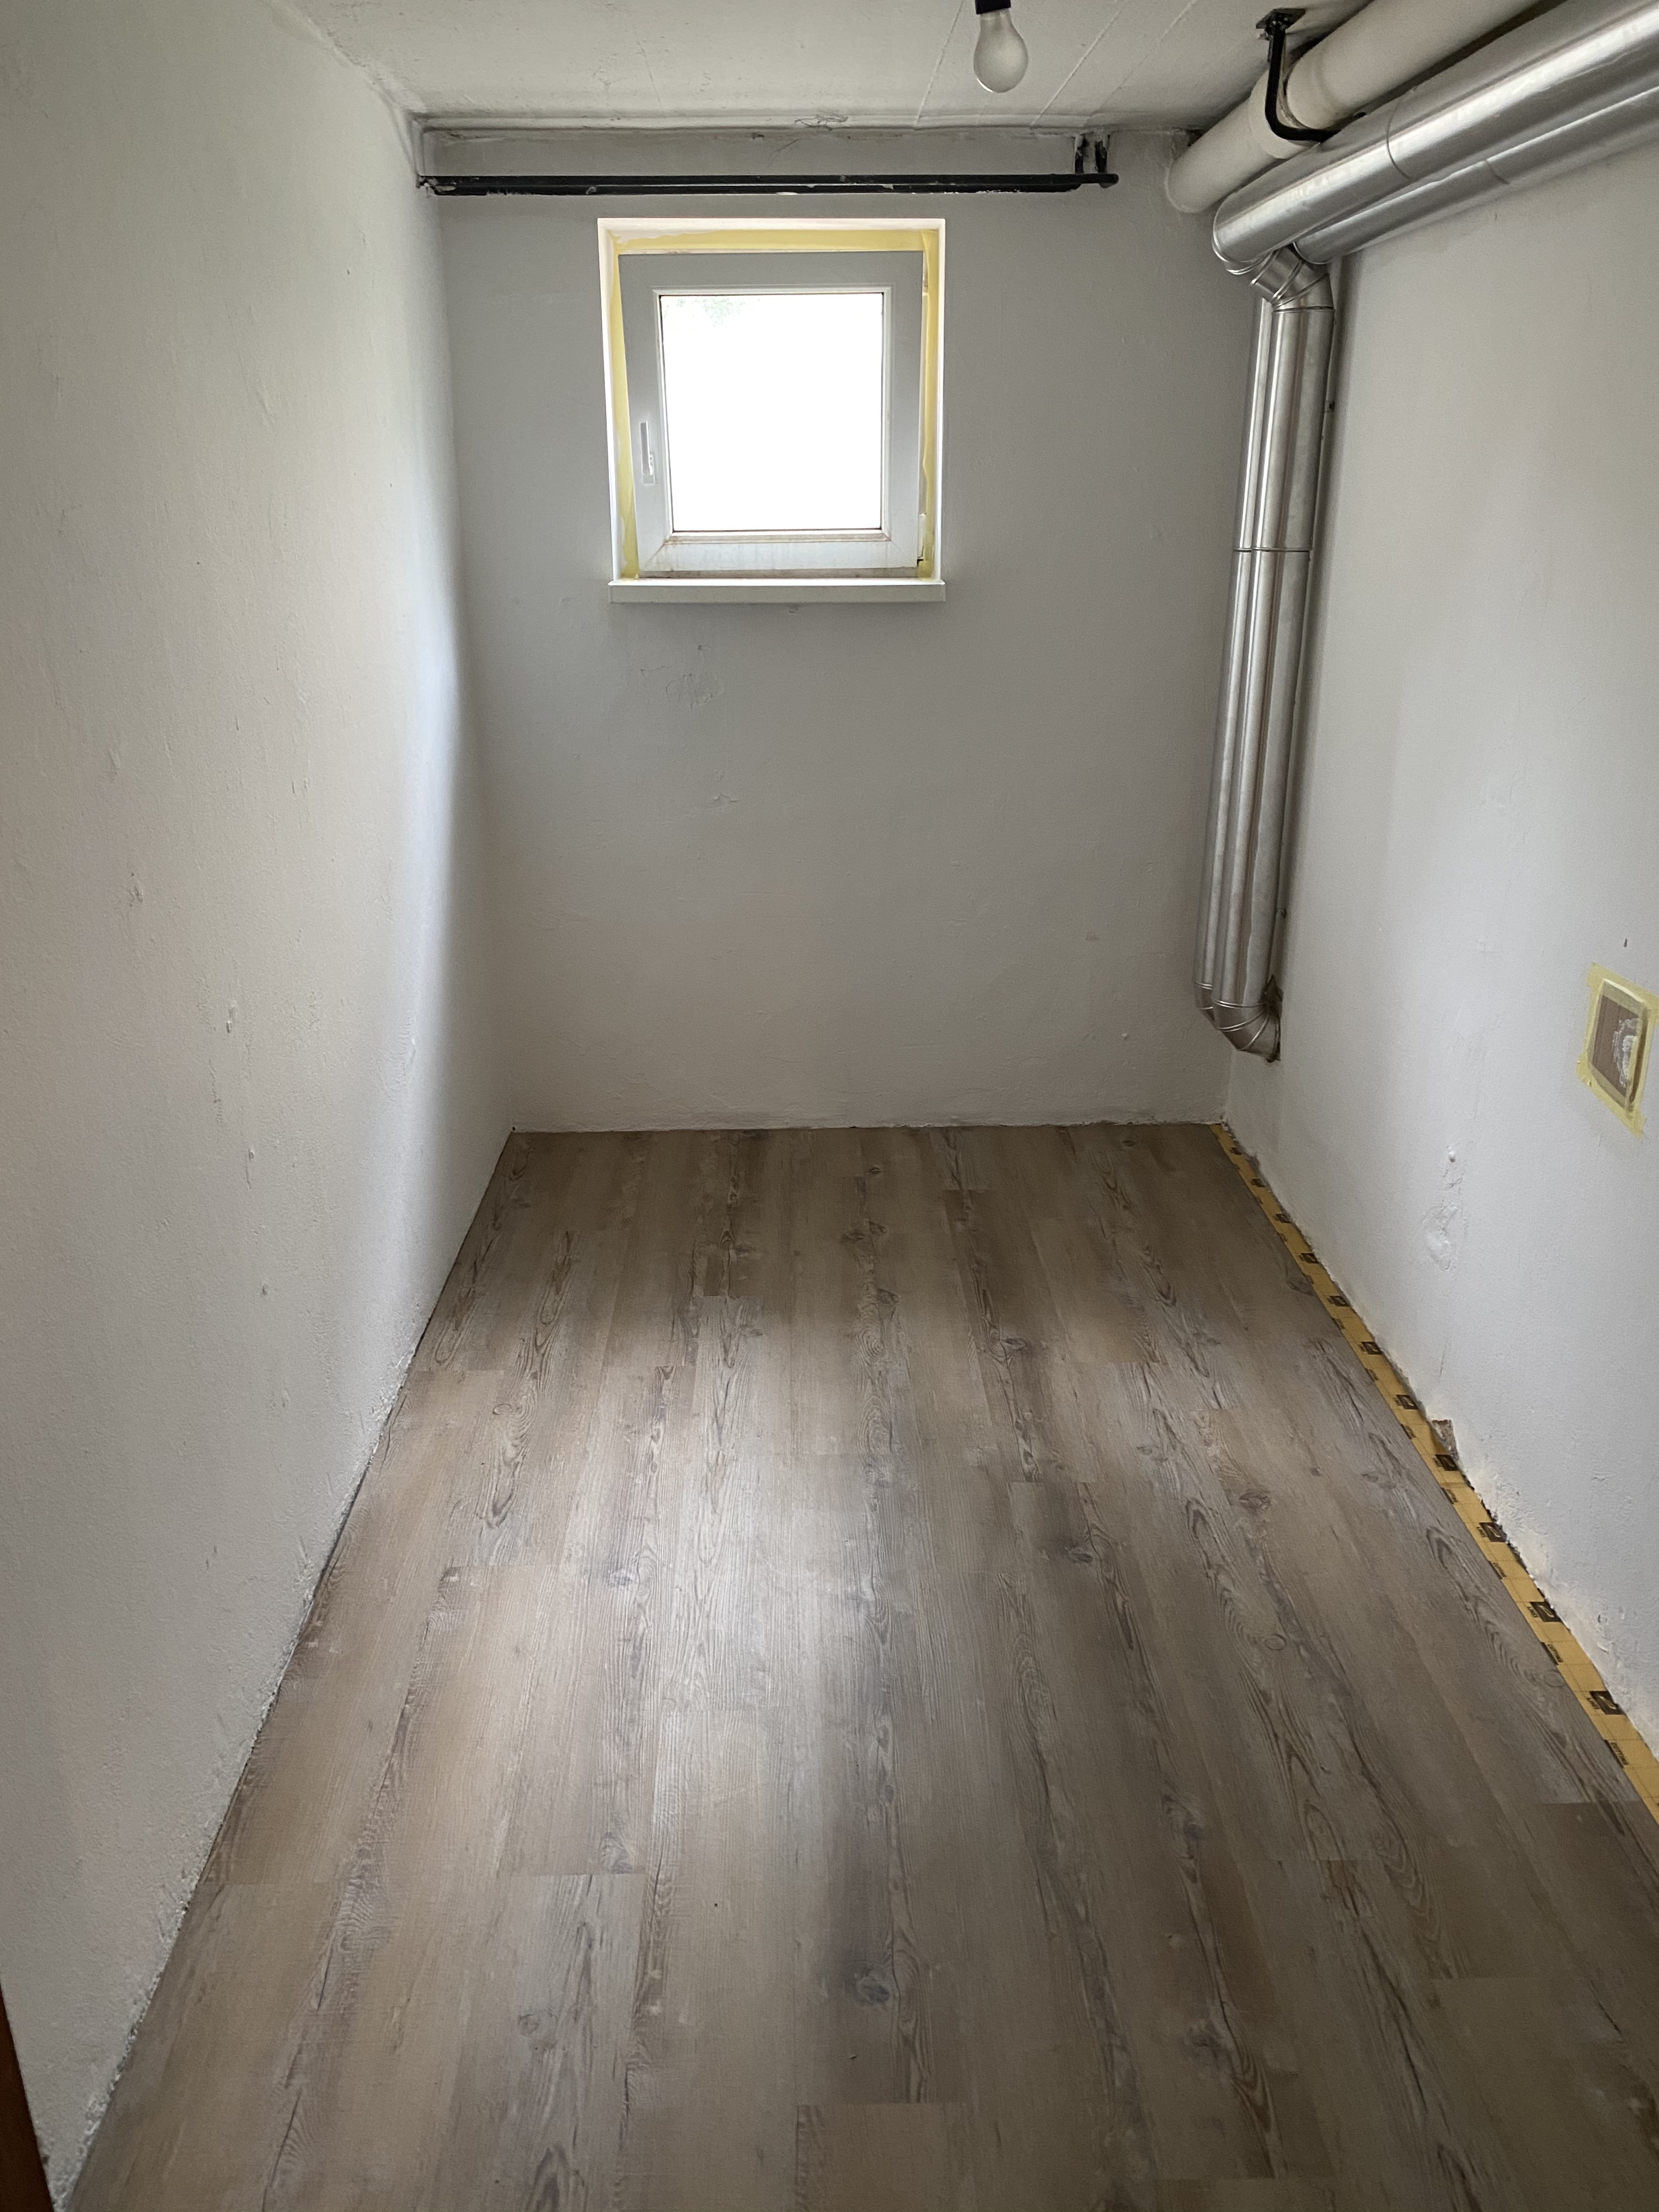
House, where I live, had a spare room in the basement that needed some fixing up. Well, it needed a bit more fixing up that I’m leading on especially because beforehand it was known as the rat room. Yeah, that’s right rats chew through the floor and took this room for their home.

Because I started doing this during lockdown material was hard to get to but I somehow managed and start working. First I painted all the walls and fixed the humidity damage on them. Then I started working on the floor. I put some floor foam on it and then over it vinyl. It came out pretty good for an amateur.
Installing ethernet cables
For my ethernet cables, I chose CAT6 that in my opinion are the best for my case in performance vs. price. I bought the cable in a box packaged as 305 m. Before I bought the cable box I’ve made a network diagram to calculate how much cable did I need.
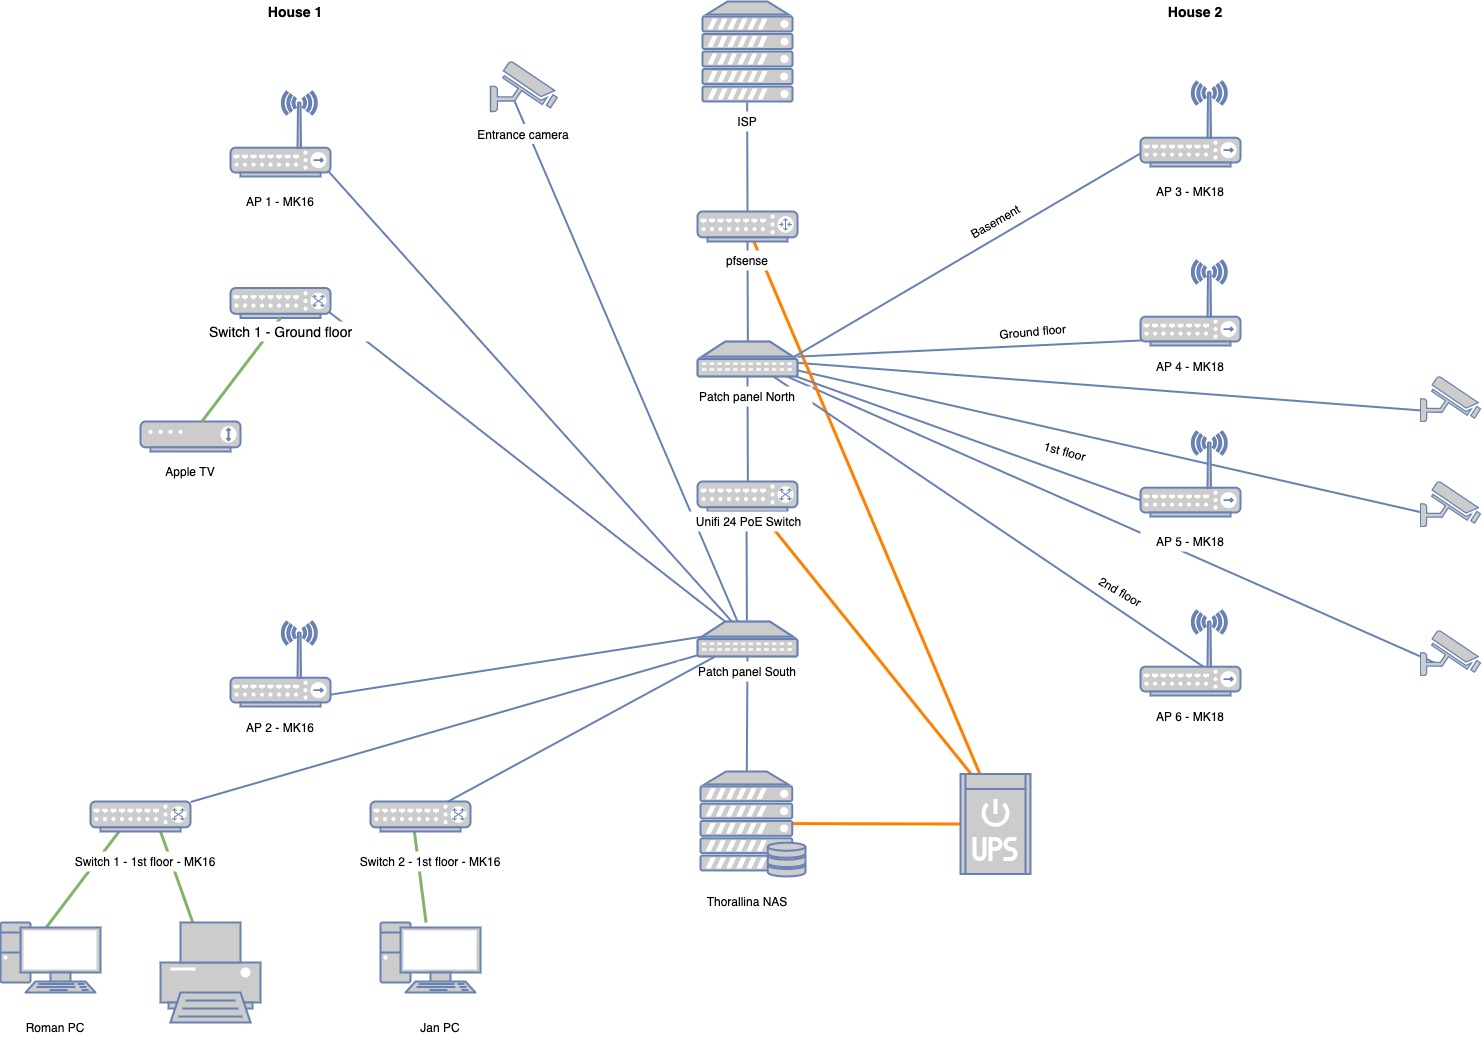
Then my friend M. and I started to install all the cables in the house I live in. We needed to install 5 cables from a basement and up to the first floor. Fun fact: CAT6 cables are thicker than CAT5e cables I was using earlier.
The other thing you can notice is that I didn’t install cables inside the walls but rather in the plastic canals that I had to screw into the walls. In Europe, we seldomly have drywalls and don’t have them in 70-year-old houses. So this was the only option.
A friend and I tried to install cable canals properly and in corners to cut them at 45 degrees angles. It took us almost half a day to install all the cable canals from the basement to the first floor. I calculated that we installed approximately 55 m of canals.
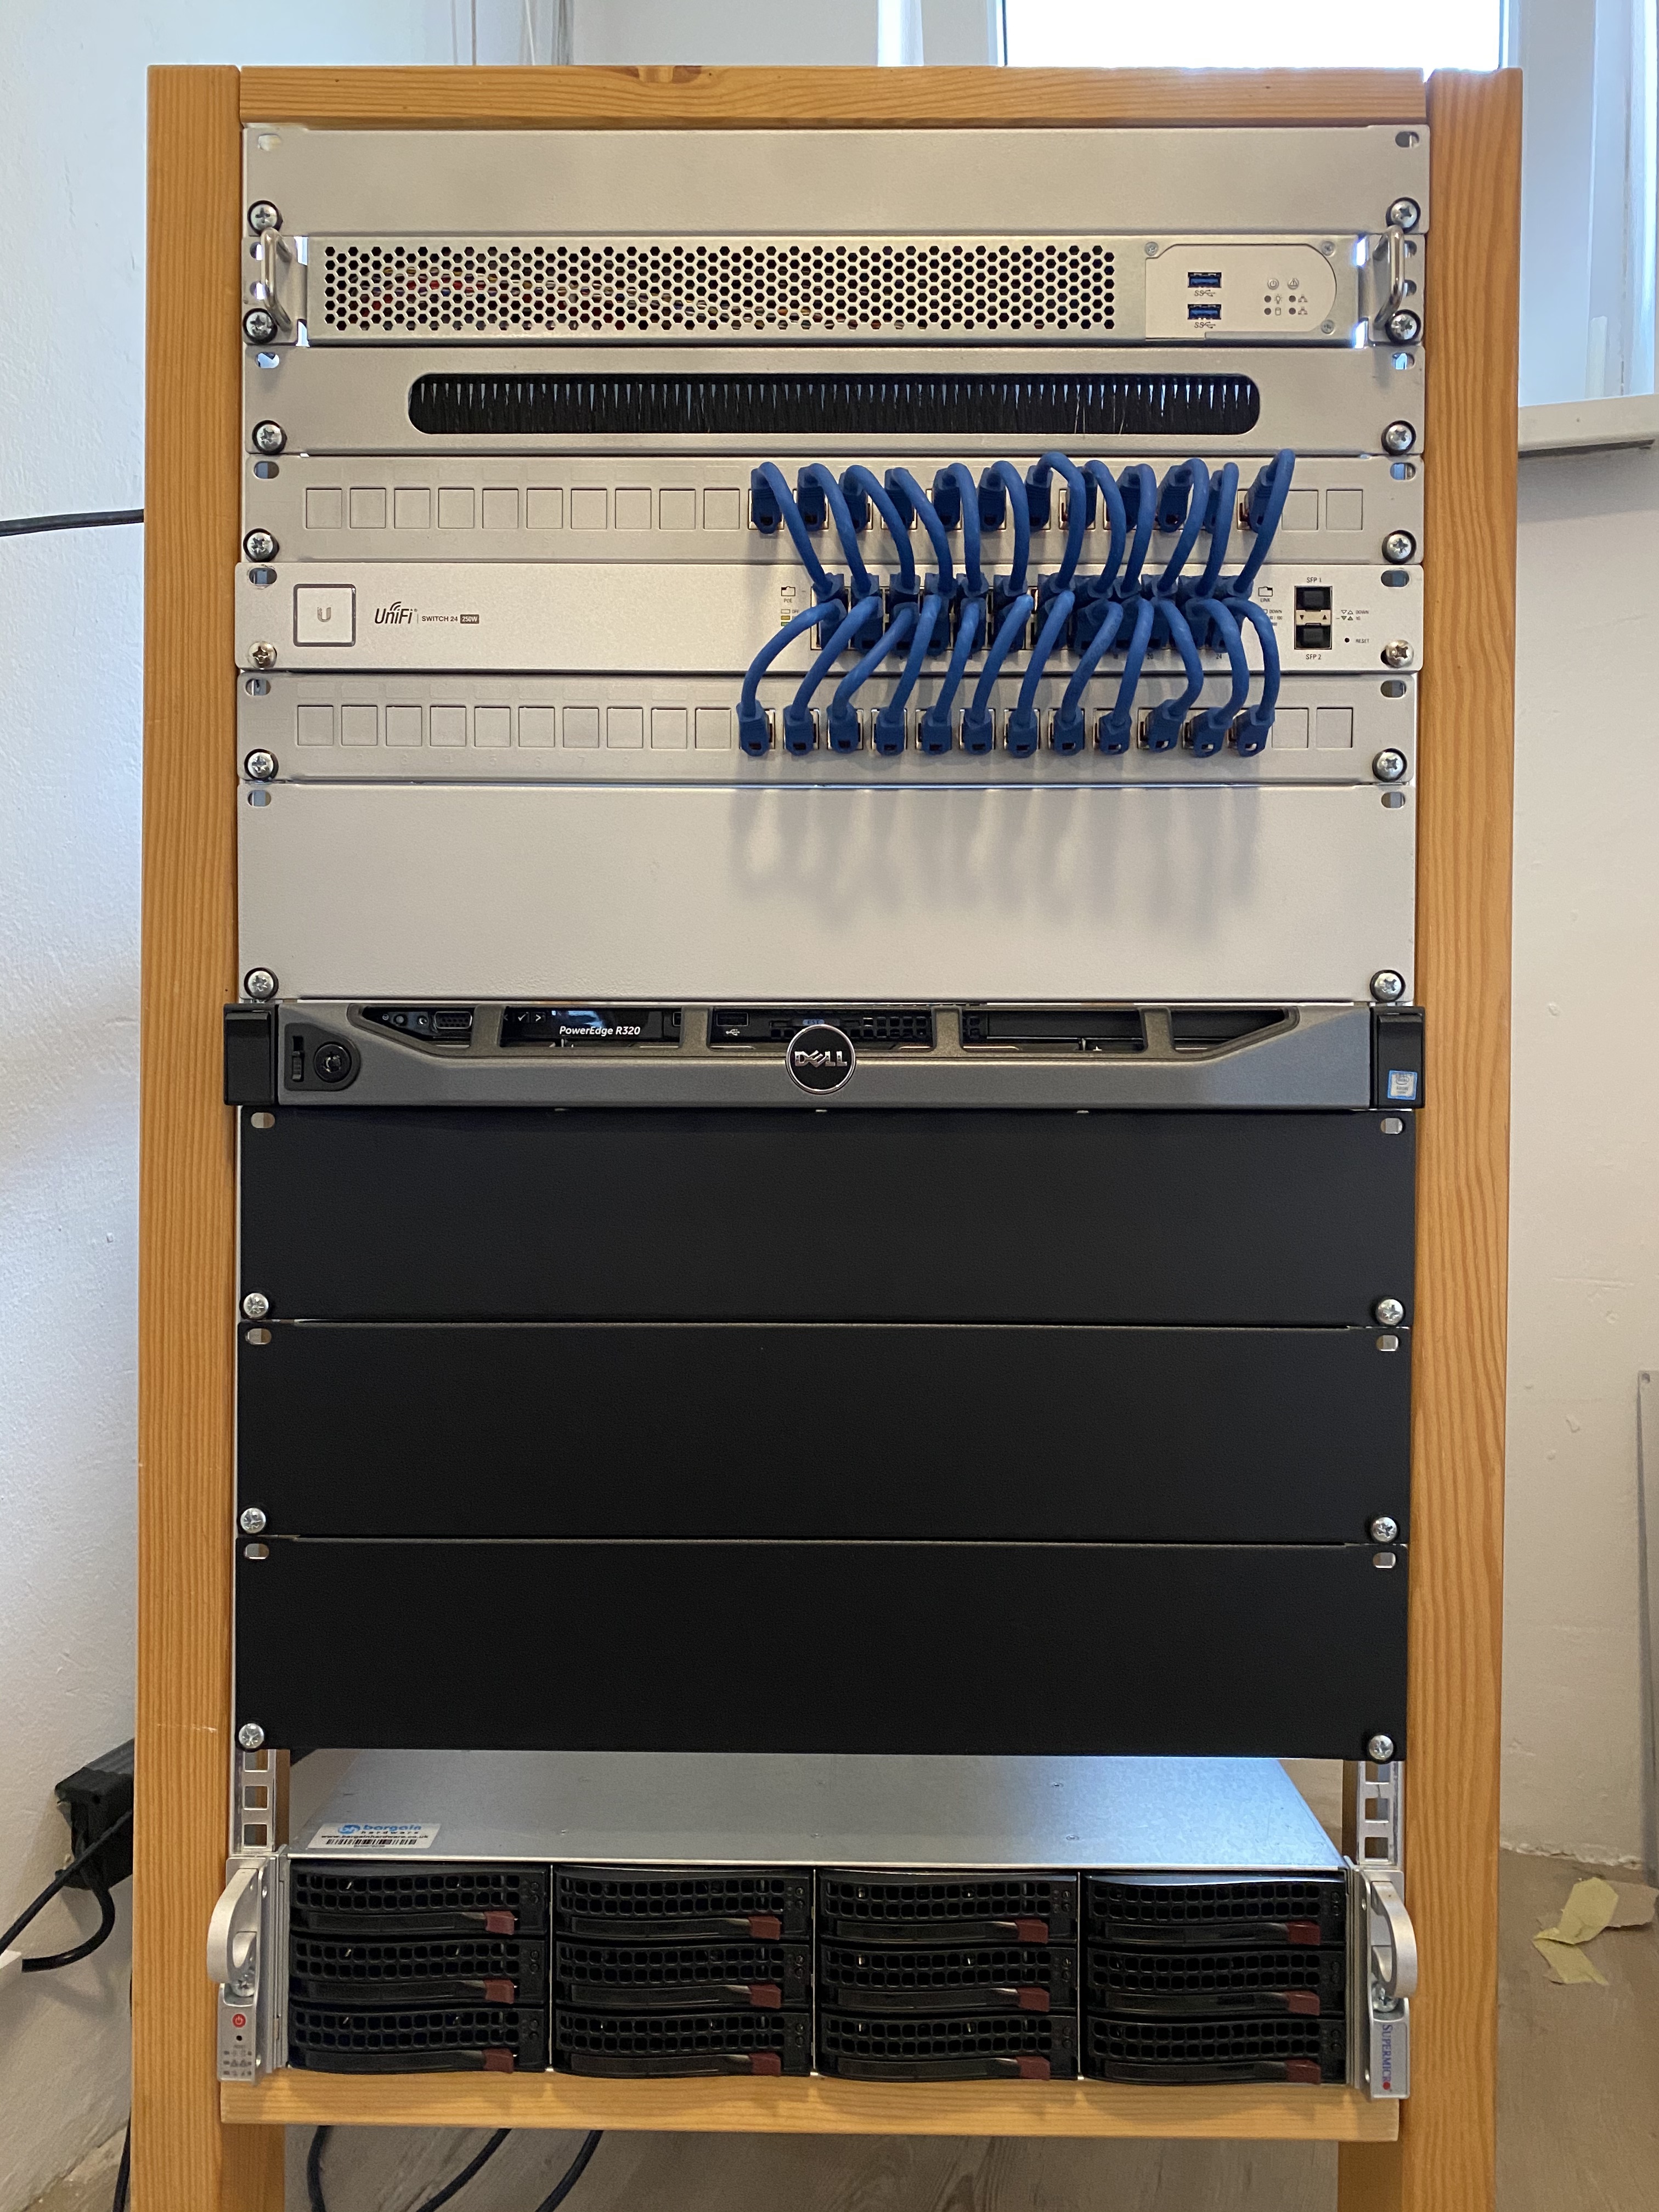
Choosing the right server rack
Racks in Europe are expensive and of course, meant for a business that usually doesn’t look at the prices. An 18U rack would cost me about 500€ so I decided to include my father who suggested to make it from wood. And so we did. I bought the rack strips and spray can.
We used a frame from my childhood bunk bed that I shared with my sister. Also, I can’t believe we still had that in storage. We finished the rack in 2 hours with all the sawing and putting it together and I measured the distance between rack strips at exactly 48,26 cm (19”). Well, that was a mistake I figured out later.
Router, switch & servers
A lot of thought went into choosing the right equipment for my needs. Did I overdo it? Of course. Am I happy with my choice? Pretty much. The research was extensive and long. I’ve read a lot of Reddit and forum posts.
Router
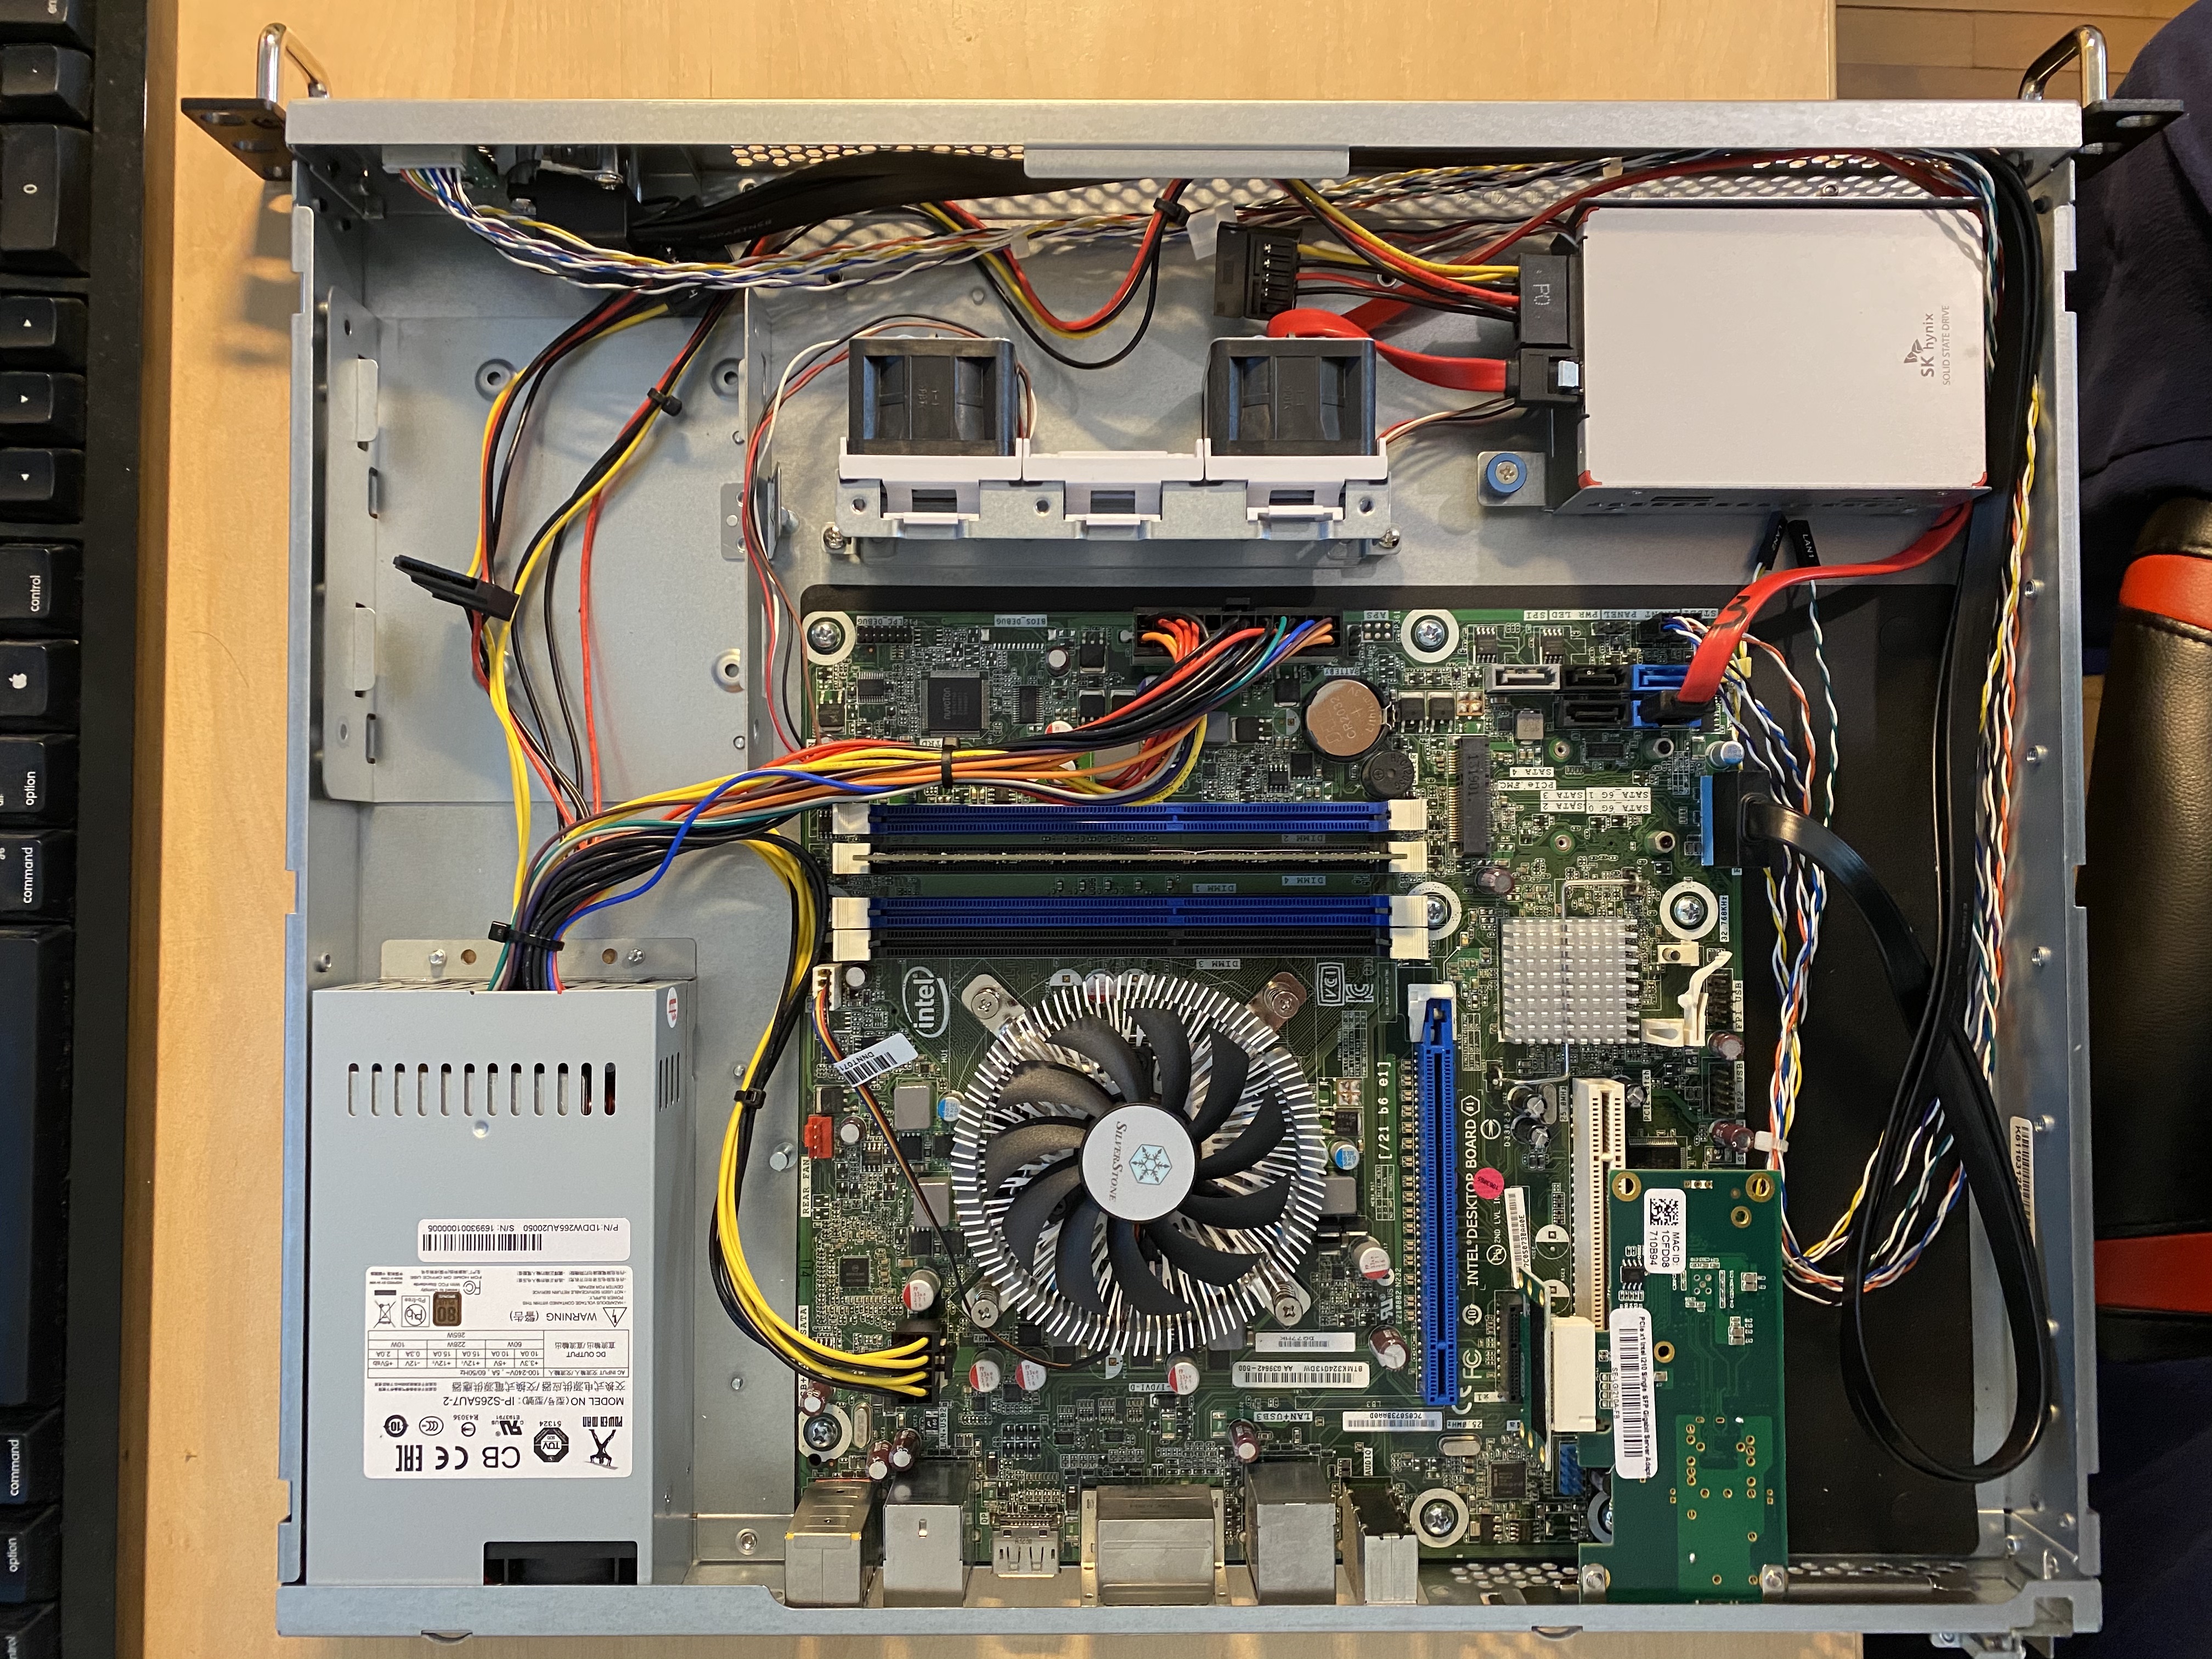
I knew I wanted to install pfsense on my router because I read how powerful and stable router OS it is. And that’s why I had to find proper hardware for it. It can generally run on any x86 processor but if you want to have a bit higher bandwidth, firewall, and VPN throughput you need to choose a bit better hardware.
My router consists of:
- Motherboard: Intel DQ77MK LGA1155
- Processor: Intel Core i5-3570T 2,3GHz Socket 1155 (TDP: 45W)
- Heat sink: SilverStone SST-NT07-115X
- 8GB DDR3 1600 MHz SDRAM
- SATA SSD 120 GB
- Housing In-Win IW-RF100 - 1U Short Depth Server Chassis - 365mm depth - with power supply
- Intel PCI-E X1 Gigabit Server Ethernet Interface 1000M Network Card
- 2x Noctua NF-A4x20

I’ll write about pfsense software in the next post.
Switch
Because I previously owned Ubiquity Unifi APs (AC-Lite) and a PoE switch (8 PoE-60W) I decided to also buy a 24-PoE 250W Unifi switch. PoE is always great and I also got a good deal locally because Unifi equipment is as expensive as Apple’s and its holds it price unbelievable so.

Servers
SuperMicro CSE-826 X9DRi-LN4F+
I found out that SuperMicro offers a lot of bang for the buck so I decided to invest in a server made by them. My friend E. suggested Bargain Hardware from the UK for a purchase of an used server and I must say that it was a really pleasant experience. Sure price is a bit higher than eBay but I also got 1 year warranty.
Specifications:
- Chassis: 1 x SuperMicro CSE-826 X9DRi-LN4F+ Rev1.20 2U 12 LFF-HS
- Processor(s): 2 x Intel Xeon E5-2630L V2 2.40Ghz Hexa (6) Core CPU*
- Heatsink(s): 2 x Supermicro (SNK-P0047P) X9DRi-LN4F+ 1U LGA2011 Heatsink
- Memory (RAM): 8 x 16GB - DDR3 1600MHz (PC3-12800R, 2Rx4) £180.00
- Memory Blanks 16 x Dell DDR3 RAM Blank £8.00
- RAID: HBA 9205-8i in IT mode*
- Hard Drive Caddy(s) 12 x Supermicro CSE-826 LFF Hot-Swap Caddy
- Hard Drives: 6 x 4TB 3.5” HGST SAS 6Gbps*
- Power Supply(s): 1 x SuperMicro (PWS-920P-SQ) CSE-826, CSE-847 Hot-Swap PSU 920W
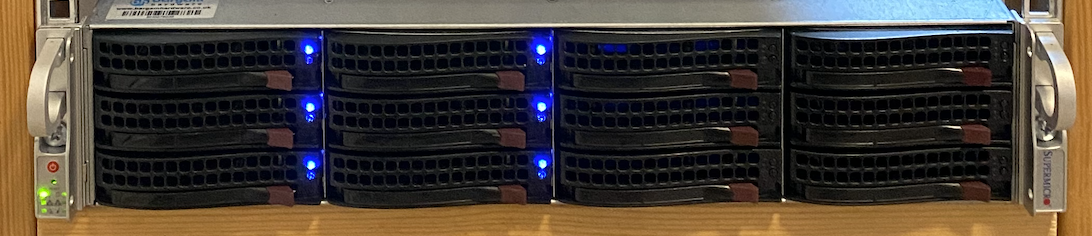
This server serves (pun intended) as my NAS. It runs FreeNAS and I’ll talk about it later. Is it overkill? Damn, right it is. Am I proud that I have it? Very much so.
*These components were replaced or added by me later.
Dell R320
The second server is meant for a playground. On it I run Proxmox and spin up and down VMs as much as I want. I found it on eBay from a company that went broke so it was a pretty sweet deal.
Specifications:
- Processor: 1x Intel Xeon E5-2430L v2 2.40Ghz Hexa (6) Core CPU*
- Memory (RAM): 64 GB DDR3 1600 Mhz
- Hard Drives: 1x 120GB SSD, 1x 240GB SSD*
- Power Supplies: 2x Dell 350W

*These components were replaced or added by me later.
Conclusion
I must say it was a wild road of research and extreme patience because everything that I ordered took so much longer to come because of 2020. My homelab project started in April and was starting operating at the end of July.
But remember homelab is never done. Since July I have made quite a few additions and modifications that I’ll share in the next blog posts. For all your questions or comments you can message me @th0r or write an email that you find here.